

Award Winning Pumpkin Decorating Ideas
Every item on this page was chosen by a Woman's Day editor. We may earn commission on some of the items you choose to buy.
59 Cute and Funny Pumpkin Carving Ideas for Halloween
Whether you're a master carver or a beginner, these cool Jack-o'-lantern ideas will spark your creativity.
It's not officially Halloween until you have a collection of carved pumpkins, arranged ever so perfectly on your front porch. So why not go all out with some seriously creative pumpkin carving ideas this year? After all, if you can only do one Halloween craft project, you should really give it your all.
From funny pumpkin faces to scary wicked witches, these cool carved pumpkin designs will take your Halloween decorating game to a whole new level. Even if you're a beginner, these Jack-'o-lantern ideas are easy to master, as long as you have some cute pumpkin carving stencils and the right pumpkin carving tools on hand (you'll want a pumpkin scooper, a tooth saw, a linoleum cutter, and an awl at the very least). And here's a pro tip to get you started: Don't make a perfect circle when you carve the top opening to remove the seeds. Add one jagged notch — it'll be easier to line the pieces back up.
So gather your gear and your gourds, because it's time to figure out what you should carve on your pumpkin — and don't forget to check out our favorite hacks to make your carved pumpkin last as long as possible.
1 of 59
Crazy Hair Jack-o'-Lanterns
Scoop out pumpkins and carve faces, then pot them when hearty green plants and herbs.
3 of 59
Hungry Jack
An apple a day keeps the bogeyman away! Carve freeform eyes and a mouth into a hollowed-out pumpkin. Cut the ends off of two squashes and push into each eye hole. From the cutout ring, cut teeth and secure with toothpicks. Use permanent marker to draw a face on an apple and position in your pumpkin's mouth.
RELATED: 50+ Easy No-Carve Pumpkin Ideas to Try This Year
4 of 59
A Little Black Magic Pumpkin
5 of 59
Goofy Grin Pumpkin
This funny pumpkin face is easy to create. Just trace your face design with a marker, then carve (don't worry about it being perfect!). Cut 1" circles out of discarded pumpkin (these are its eyeballs) and shave around the edges, then attach with pins or toothpicks.
RELATED: 20 Fun Facts You Didn't Know About Pumpkins
6 of 59
Scarface
Draw eyes, mouth and scar (an angled horizontal line that goes all the way around) on the pumpkin with a marker. Following the scar line, cut the pumpkin in half. Scoop out the seeds; discard. Insert many half-toothpicks into the bottom part of the rind; replace the top part, pressing into the exposed toothpicks to hold the parts together.
Carve out the eyes and mouth; slice into the scar shape at an angle to make it more visible. Wipe off remaining marker with a damp cloth. Using a skewer or awl, puncture pairs of holes opposite each other ½" apart along the length of the scar. Bend a Q-tip into a U shape; press each end into a pair of holes opposite each other. Continue until holes are filled. Press olives onto half-toothpicks and press into eye holes.
7 of 59
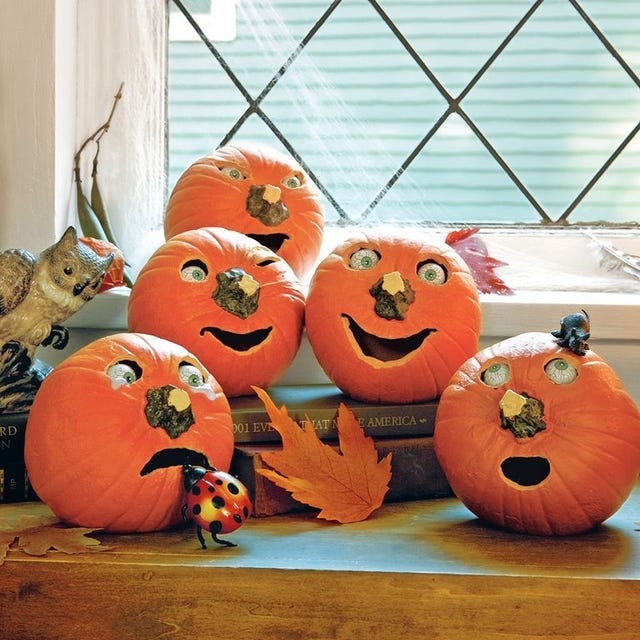
Pumpkins with Personality
Look out, because these perky pumpkins are looking back! Cut eyeholes in your pumpkin, and attach plastic eyeballs (available at party supply stores) inside the sockets to give the face a spooky stare.
SHOP PLASTIC EYEBALLS
8 of 59
Pumpkin Eyes
Keep an eye (or two) on the neighborhood with these creepy carved pumpkins. The secret? A smaller white pumpkin goes inside a larger orange pumpkin.
Get the Pumpkin Eyes tutorial.
9 of 59
Medusa
Don't look this modern Medusa in the eye or you might turn to stone! Carve two large round eyes, two smaller circles for nostrils, and a squiggly mouth. (Tip: Measure and plan for eyeholes to fit LED lights snugly.) Push in green LED tealights. Hot-glue armature wire to back of rubber snakes, leaving a few extra inches on back end. Push wired snakes into top at sides for pigtails.
SHOP PLASTIC SNAKES
10 of 59
Wicked Witch Pumpkin
Position the pumpkin so the stem is centered where the nose should sit. (Tip: If the pumpkin wobbles, try securing an acorn or two at the base with hot glue to create anchoring feet). Using the washable marker, draw on eyes, eyebrows and a mouth. Try following the natural ribs of the pumpkin as a guide when deciding where to place the facial features, like the raised eyebrows or the curved mouth.
With the tip of the craft knife, scrape away the top layer of rind to reveal the lighter flesh underneath. Be careful not to poke all the way through to the inside of the pumpkin. Wipe away any excess marker with a damp paper towel. Remove the cap from two acorns and discard. Press each acorn into the flesh of an eye socket until it's secured.
Spread a bead of hot glue along the top and sides of the pumpkin where you want the hairline to be. Create the witch's mane by pressing on Spanish moss, adding enough so the orange rind is covered. Place the witch hat on top, securing with bobby pins at the back, if necessary.
SHOP WITCH HAT
11 of 59
Hear No Evil, See No Evil, Speak No Evil
This stacked-pumpkin statue — complete with mini pumpkin eyes and faux-skeleton arms — denies any wrongdoing. Trace the littles onto the large orange pumpkin for eye hole sizing; carve out circles, then insert mini pumpkins (bottoms face out). Add black thumbtack pupils. Carve a mouth. Repeat to create all three expressions, then stack carved pumpkins and secure with skewers. Use T-pins to attach three pairs of skeleton arms and hands.
SHOP BLACK THUMBTACKS
12 of 59
Mummy Pumpkin
Carve an opening out of the top of the pumpkin and scoop out the seeds. Cut pumpkin horizontally all the way around, 1" to 2" below the opening. Repeat several times until you've carved the whole pumpkin into 1" to 2" circles all the way around (don't worry about making your cuts particularly straight or wavy).
Separate the pieces. Keeping the top and bottom pieces the same, restack the others in a different order. Rotate the pieces until you get a shape you like, enlarging the carvings for eyes or mouth if desired. Starting from the bottom, lift each level of pumpkin, insert a few toothpicks onto the level below, then press down to secure in place. Continue with the next level up until entire pumpkin is held together. Place beans into eye holes, securing with half-toothpicks if necessary.
13 of 59
Cannibal Pumpkin
Carve an opening out of the top or bottom of the large pumpkin, making sure it's wide enough to fit a smaller pumpkin or gourd through it. Scoop out the seeds. Draw eyes and a mouth on both pumpkins with the marker. Carve out with a knife for the larger pumpkin; use the melon baller for the smaller pumpkin.
Wipe off any remaining marker with a damp cloth. Place small pumpkin inside large one and replace the top (or bottom) cutout.
14 of 59
Flower Power Pumpkin
A clever mix of sunflower seeds, pinecone petals (for teeth!), dried leaves, and artificial foliage makes this simple pumpkin a natural wonder.
SHOP FAKE FLOWERS
15 of 59
Punk Pumpkin
Carve one circle eye and one half-moon eye, half-moon nose, and boomerang mouth in a large pumpkin. Push a black- painted wooden circle "pupil" into bottom of circle eye. With X-Acto knife, cut 4"-wide, 8"-long, and 3"-deep slit around stem. Bundle wheat into sections with floral tape and trim bottom stems to three inches. Line bundles up in slit to create a cool Mohawk, then attach your Jack-o-lantern head to a scarecrow body, and prop him up on your porch.
SHOP WHEAT
16 of 59
Zombie Pumpkin
Using a craft knife, cut a hole in the top of the pumpkin and hollow out the inside. Scrape away any extra flesh with the spoon. Rinse a handful of the seeds (about 16 or so), pat dry and set aside. With a washable marker, draw two large ovals for eyes (position them slightly tilted towards each other for a sweeter, less scary look) and a wide, slightly lopsided mouth. Carve out with the craft knife and save the scraps. Wipe away any excess marker with a damp paper towel.
Use a melon baller to carve out two round eyeballs from the fleshy side of the pumpkin scraps. Spear each eyeball with a toothpick and attach them to the tops of the eye cutouts. Gently press a peppercorn into the center of each to create pupils.
Press the cleaned seeds directly into the mouth, positioning them in different directions. (Tip: If the pumpkin isn't completely ripe, try using the tip of the knife to create small notches in the pumpkin where you'll be inserting the teeth.) Complete the look by turning the mini pumpkins upside down and placing them in front of the zombie head to look like hands.
17 of 59
Lollipop Pumpkin
Hollow out a medium pumpkin from the bottom. Carve a half-circle mouth with a tooth, two half-circle eyes with pupils, and triangle nose.
For eyes, push in inner piece (don't remove!). Then, etch away skin on pupils and tooth with linoleum cutter. Use an awl to poke holes about 1 1/2" apart across top and sides of pumpkin. Push lollipops into holes to create hair.
18 of 59
Eye Spy Pumpkin
After you carve a freeform facial expression, including circle eyes, a triangle nose, and jagged teeth. Push a faux spider into one eyehole (measure the spider before carving the eye hole to make sure it will fit!).
SHOP PLASTIC SPIDERS
20 of 59
Melon Ball Pumpkins
Carve an opening out of the top or bottom of the pumpkin and scoop out the seeds. Replace the cutout. Draw eyes and mouth on the pumpkin with a marker. Use a melon baller to scoop out two small spheres from the outside of the pumpkin. Reattach each sphere to the pumpkin with half a toothpick. If desired, press seeds or spices into the spheres for pupils.
For scooped mouth (far left): Scrape partway through the rind with the melon baller to form the mouth shape. Cut out a mouth and multiple eye holes using the knife or pumpkin carver. Using discarded eye cutout, carve two eye shapes. Create two scooped eyeballs and attach them to the eye shapes with half a toothpick. Attach the finished eyes to the pumpkin with toothpicks. Wipe off any remaining marker with a damp cloth.
21 of 59
Hoo Is the Wisest? Pumpkin
22 of 59
Franken-Pumpkin
This is a mash-up of two medium-large pumpkins and two small gourds (for eyes). Once you've cut, carved, and stacked pieces, "stitch" Frank up by poking holes in the top parts and inserting 2-inch pieces of wire. Finish off with two bolts.
23 of 59
Toothy Pumpkin
This surprised fella will look adorable (in a scary way!) on your stoop. Carve circle eyes and big mouth in any size squash. Push artificial nails into edge of mouth for teeth. For eyes, glue black sequin pupils to at seashell coins; push into place.
SHOP FAKE NAILS
24 of 59
Zipper Pumpkin
Hollow out medium round pumpkin from the bottom. Carve two oval eyes, then cut two smaller circles from leftover rind for pupils. Etch away skin on each pupil using a linoleum cutter, attach black button with pin on top and secure to pumpkin with toothpick.
For eyebrows, use awl to poke three holes above each eye as shown. Push a length of ¼"-wide black ribbon through left hole; knot inside to secure, then thread through holes and knot to close.
Repeat for right eyebrow. For mouth, unzip zipper a little more than halfway. Use black pushpins or silver straight pins (color heads with black permanent marker) to attach zipper, shaping mouth opening. Trace inside open part of zipper with highlighter. Unpin to carve mouth, then repin in place.
SHOP ZIPPERS
25 of 59
Corny Jackie
With highlighter, draw curved line on white pumpkin for mouth; add half-circles below for teeth. Carve along bottom of teeth, widening as needed. Using linoleum cutter, etch away skin on teeth.
Carve eyes, then hot-glue two black jelly beans as pupils. Hot-glue candy corn nose and eyelashes. For hair, dip dried corn husks (from a grocery store) in a bowl of water and lay them out. While still damp, tear into different-width strips.
To make curly pieces, roll a few and secure with paper clips until dry. Working around stem, hot-glue one end of each husk strip to top of pumpkin; use straight pins to secure as needed. Fold two wider corn husk strips in half, and wrap together at ends with a third strip to form a bow; hot-glue in place.
SHOP LINOLEUM CUTTERS
26 of 59
Toothy Grin Pumpkin
Spray paint about 15 dry penne pieces and two shell pasta pieces black on a covered surface in a well-ventilated area. Let dry. Flip pasta over and repeat on the unpainted side. Carve freeform eyes and a jagged mouth onto your pumpkin, then push the black pasta pieces in to creates pupils and teeth.
27 of 59
Night Owl Pumpkins
When the sun goes down, these pumpkins are a hoot. Print and tape the templates (Baby Owl, Mama Owl, and Daddy Owl) to the front of a hollowed-out pumpkin, then use a transfer tool or metal skewer to poke holes along the outline of the template.
Remove and discard the template, then use a carving knife to cut along the design. Paint almonds and Brazil nuts orange and glue in place for feet and ears.
28 of 59
Witch Pumpkin
Make this bewitching display at home by first hollowing a green heirloom pumpkin. Carve out mouth and eyes, then attach parsnip nose with toothpicks. Straight-pin faux berry branches on top for hair. Print hat template and trace onto felt; cut out tracing and assemble with hot glue. Wrap ½-inch satin ribbon above hat brim and place on top of hair.
Get the Witch Hat stencil.
29 of 59
Peekaboo Pumpkin
With a large serrated knife, cut off top ⅓ of large orange pumpkin and hollow out. Then hollow out bottom part too, and on each side, cut a hole halfway down; push skeleton arms through. Cut divots in bottom's base to keep arms steady.
For skull, trace plastic Halloween eyeballs on a small white pumpkin; hollow inside traced circles with melon baller, push eyeballs into holes, and then carve a mouth. Position stemless medium white pumpkin inside bottom section of big pumpkin for body; top with skull. Secure top and bottom sections of large orange pumpkin along back and sides with wood skewers. Arrange skeleton hands over top.
Lauren Matthews Group Digital Content Director Lauren, Good Housekeeping's digital director, has over 15 years of experience writing and editing beauty, lifestyle, home, health, and entertaining content for publications including Country Living, Woman's Day, Brides, and First for Women.
This content is created and maintained by a third party, and imported onto this page to help users provide their email addresses. You may be able to find more information about this and similar content at piano.io
Award Winning Pumpkin Decorating Ideas
Source: https://www.womansday.com/home/crafts-projects/g950/funny-pumpkin-carving-ideas/
Posted by: kellyhishentimed.blogspot.com
0 Response to "Award Winning Pumpkin Decorating Ideas"
Post a Comment