

What Does Watchguard Authpoint Logon App Do?
![]()
Contents ● AuthPoint Help
Configure MFA for a Computer or Server
The Logon app enables you to require authentication when users log in to a computer or server. This includes protection for RDP and RD Gateway.
There are two parts to the Logon app:
- The application you install on a computer or server
- The resource you configure in AuthPoint
To configure MFA for a computer or server, you must configure a resource for the Logon app in the AuthPoint management UI and then install the Logon app on each computer or server that you want to protect. For Remote Desktop and RDS connections, you install the Logon app on the hosts that users authenticate to. To protect the RD Gateway server itself, you install the Logon app on the server. To protect the hosts behind the RD Gateway, you install the Logon app on the hosts.
When you install the Logon app, authentication is required to log in. On the login screen, users must type their password and then select one of the allowed methods of authentication (push notification, one-time password, or QR code).
The Logon app supports only password authentication for the initial user login. If you install the Logon app on a computer that supports biometric features, such as Touch ID or Windows Hello, users cannot use those features to log in. Users must log in with a password and AuthPoint MFA. After the initial login, users can use biometrics.
Users can log in with domain or local user accounts, but all users must have an active AuthPoint user account with an authentication policy for the Logon app. Users that do not have an AuthPoint user account with an authentication policy for the Logon app cannot authenticate and log in to a computer with the Logon app installed unless you enable the option to allow specific non-AuthPoint users to log in without MFA.
If your AuthPoint license expires or you delete your Logon app resource, users can log in to their computers with only their password.
You can download the Logon app from the Downloads page in the AuthPoint management UI.
Requirements
When you set up and deploy the Logon app, be aware of these requirements:
- All domain and local users must have an active AuthPoint user account and be part of an AuthPoint group with an authentication policy for the Logon app to authenticate and log in
You can enable the option to allow specific non-AuthPoint users to log in without MFA for users that do not have an AuthPoint user account.
- The user name for local and domain users must be the same as their AuthPoint user name
- To log in as a local user (not part of the domain), you must have an AuthPoint user account with an active token
- If your local user has the same user name as your domain user, you can use the same AuthPoint user to authenticate and log in to both accounts
- If your local user name is different from your domain user name, you must have a separate AuthPoint user for each user account (one for the domain user and one for the local user)
- When you install the Logon app, the computer must be connected to the Internet before you log in for the first time
- If you install the Logon app on a computer in an Active Directory domain, you must configure a group policy to allow domain users to authenticate (log on) locally
- If you install the Logon app on a computer that supports biometric features, such as Touch ID or Windows Hello, users cannot use those features to log in
Do not install the Logon app on computers that run Windows 7 or older or on servers that run Windows 2008 R2 or older.
Add a Logon App Resource
To start, you must add a resource for the Logon app. You do not need a separate Logon app resource for each computer that the Logon app is installed on. You can use one Logon app resource for all of your authentication policies, regardless of the OS.
After you add a Logon app resource in AuthPoint, you must add the resource to your existing authentication policies, or add new authentications policies for the Logon app resource that include any user groups that must authenticate to log in to their computers.
To add a Logon app resource:
- Select Resources.
- From the Choose a resource type drop-down list, select Logon App. Click Add Resource.
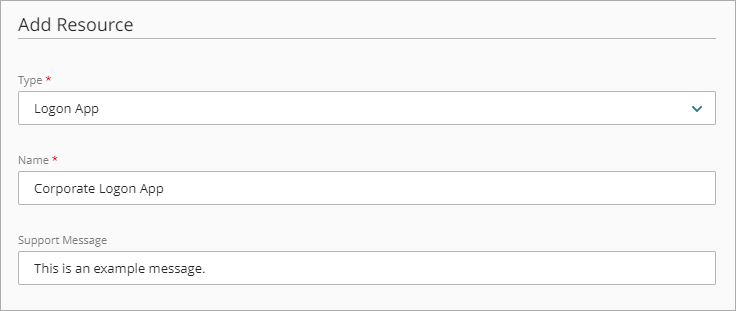
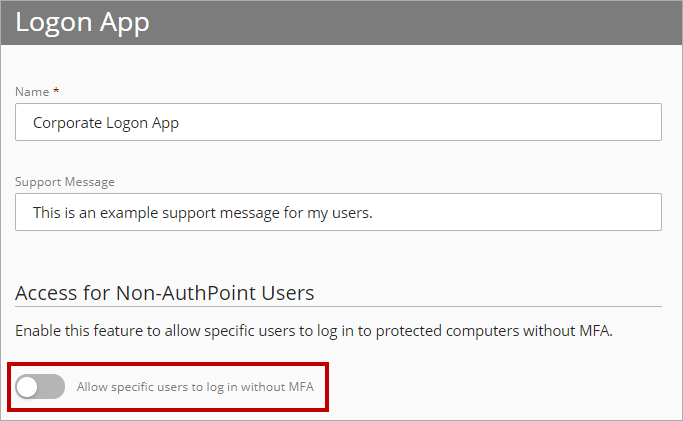
- On the Logon App page, in the Name text box, type a name for this resource.
- (Optional) In the Support Message text box, type a message to show on the logon screen.
- To allow specific users that do not have an AuthPoint user account to log in without MFA, enable the Allow specific users to log in without MFA toggle.
Non-AuthPoint users can only log in without MFA if an AuthPoint account with the same user name does not exist.
- In the Add User Names text box, type the user name of each non-AuthPoint user that can log in without MFA. You can specify up to 50 non-AuthPoint users that can log in without MFA.
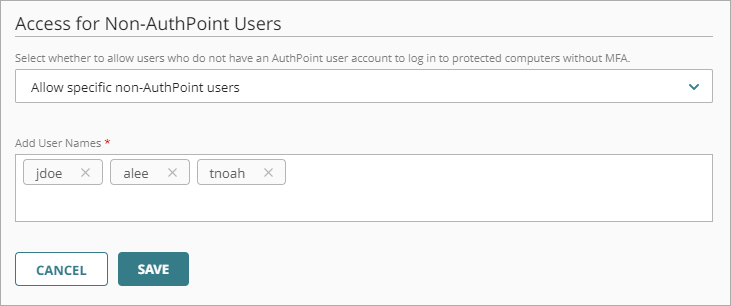
- Click Save.
- Add the Logon app resource to your existing authentication policies, or add new authentications policies for the Logon app resource (see About AuthPoint Authentication Policies). We recommend that the authentication policy for the Logon app includes the QR code or OTP authentication options so users can authenticate when they are not connected to the Internet.
Download and Install the Logon App
You can use a Windows command prompt to install the Logon app. You can also use the command line option for deployment through Active Directory Group Policy Objects (GPO). To install the Logon app from a Windows command prompt, you must download the Logon app .MSI installer file and configuration file.
When you install the Logon app, the computer you install the Logon app on must connect to the Internet before the user logs on for the first time. This is required so that the Logon app can communicate with AuthPoint to check the authentication policies.
The Logon app stores a copy of the authentication policies locally on the computer. The Logon app uses this local policy when a user authenticates offline, and it is updated when the computer next connects to the Internet.
Download the Logon App Installer and Configuration File
To download the Logon app installer and configuration file:
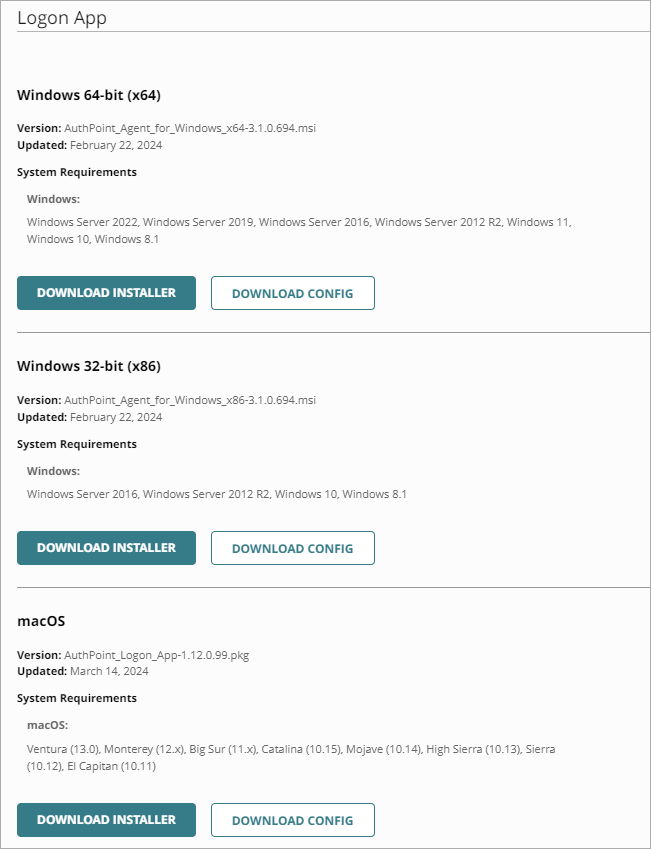
- From the navigation menu, select Downloads.
The Downloads page appears. - In the Logon App section, next to your operating system, click Download Installer.
- To download the configuration file for the Logon app, click Download Config. You can use the same configuration file for every installation of the Logon app, regardless of the operating system.
Manually Install the Logon App
To manually install the Logon app, on your computer, move the downloaded configuration file to the same directory as the Logon app installer (.MSI file). Run the Logon app installer and install the Logon app on the computer or server that you want to protect.
Install the Logon App from a Windows Command Prompt
To install the Logon app from a Windows command prompt:
- In the Windows Start menu, right-click Command Prompt and select Run as Administrator.
A Windows Command Prompt window opens. - Change directory to the location of the .MSI file.
- To run the Logon app installer, run one of these commands:
- To pass the path to the configuration file:
msiexec -i AuthPoint_Agent_for_Windows_x64-2.1.0.218.msi CONFIG_PATH="C:/wlconfig.cfg" - To pass the content of the configuration file:
msiexec -i AuthPoint_Agent_for_Windows_x64-2.1.0.218.msi CONFIG_CONTENT="config_file_content_without_spaces" - If the installer and the configuration file are in the same location:
msiexec -i AuthPoint_Agent_for_Windows_x64-2.1.0.218.msi
Make sure to update the command to match the version of the installer you want to run.
To install the Logon app silently, with no user interaction required, append /q or /qn to the command. To prevent a computer restart when the installation completes, append /norestart to the command. For more information, see the Microsoft documentation for the msiexec command.
- To pass the path to the configuration file:
Use an Active Directory GPO to Install the Logon App
You can use the commands described in the previous procedure to install the Logon app remotely on multiple computers through an Active Directory Group Policy Object (GPO). You must use an installation method that supports command line parameters.
There are two methods to configure a GPO to install from an .MSI file with command line parameters:
Option 1 — Create a System Startup GPO That Runs a Batch File![]()
Configure a GPO for a startup script or logon script that runs a batch file that installs the Logon app. The batch file contains only one line, which specifies the network path to the .MSI file. The other parameters are the same as described in the previous procedure for installation from a Windows command prompt.
- To pass the path to the configuration file:
msiexec -i "[path]\AuthPoint_Agent_for_Windows_x64-2.1.0.218.msi" CONFIG_PATH="C:/wlconfig.cfg" - To pass the content of the configuration file:
msiexec -i "[path]\AuthPoint_Agent_for_Windows_x64-2.1.0.218.msi" CONFIG_CONTENT="config_file_content_without_spaces" - If the installer and the configuration file are in the same location:
msiexec -i "[path]\AuthPoint_Agent_for_Windows_x64-2.1.0.218.msi"
Make sure to update the command to match the version of the installer you want to run.
Option 2 — Create a Software Installation GPO That Uses a Transform (MST) File![]()
Create a transform file (.MST) that contains the required command line parameters. The Orca tool to create the .MST file is in the Windows SDK, which is available from Microsoft.
To create the .MST file in Orca:
- Open Orca.
- Select File > Open and select the .MSI file you downloaded.
- To start a new transform, select Transform > New Transform.
- In the Property list, add a property:
- To pass the path to the configuration file, add the CONFIG_PATH property with the path to the configuration file.
- To pass the content of the configuration file, add the CONFIG_CONTENT property with the content of the configuration file (without spaces).
- If the installer and the configuration file are in the same location, you do not have to add a property.
- To generate the transform file, select Transform > Generate Transform.
- To save the transform file, select File > Save Transformed As.
- Copy the original .MSI file to the directory that contains the .MST file.
- To manually test the installation, type this command:
install: msiexec -i AuthPoint_Agent_for_Windows_x64-2.1.0.218.msi -q TRANSFORMS=[Logon app mst file]Make sure to update the command to match the version of the installer you want to run.
After you create the .MST file, create a Software Installation GPO that includes both the .MSI and .MST files.
To create the Software Installation GPO:
- Open the Group Policy Management Editor.
- Navigate to the software installation settings.
- Right-click and select New > Package.
- Specify the network path to the .MSI file.
- Select Advanced.
- Select the Modifications tab.
- Click Add.
- Specify the network path to the .MST file.
- Click OK.
- In the Windows Start menu, right-click Command Prompt and select Run as Administrator.
A Windows Command Prompt window opens. - Use gpupdateto refresh the group policy settings.
- To test the GPO, reboot a computer in the domain.
Update the Logon App
The Logon app does not automatically upgrade to the latest version. To upgrade the Logon app, you must download and install the updated version of the agent for Windows or the agent for macOS. The most current version of the agent is available on the Downloads page.
You do not have to uninstall the Logon app or download a new configuration file when you install an updated version of the agent.
To update the agent for Windows:
- In the AuthPoint management UI, select Downloads.
- In the Logon App section, next to your operating system, click Download Installer. You do not have to download the configuration file.
- Run the downloaded Logon app installer on the computer or follow the steps in the previous sections to install the agent with the command line or a GPO.
Uninstall the Logon App
You might uninstall the Logon app when you no longer need to protect a computer or server with AuthPoint MFA.
If your AuthPoint license expires and the Logon app is installed, users can log in to their computers with only their password.
To uninstall the Logon app for Windows:![]()
- Open the Windows Start menu and select Settings.
- Navigate to Apps & Features.
- Select AuthPoint Agent for Windows.
- Click Uninstall.
- After the Logon app is uninstalled, restart your computer.
To uninstall the Logon app for macOS (version 1.5.21 and higher):![]()
To uninstall version 1.5.21 or higher of the Logon app for macOS, you must run the Logon_App_for_Mac_uninstall.pkg package file.
- Navigate to /Users/$USER/Applications/WatchGuard.
- Run the Logon_App_for_Mac_uninstall.pkg package file.
- Follow the steps in the wizard. When you finish, you must restart your computer.
To uninstall the Logon app for macOS (version 1.5.20 and lower):![]()
To uninstall version 1.5.20 or lower of the Logon app for macOS, you must use the Terminal app to run the uninstall.sh script. You can find the uninstall.sh script in the Applications folder (/Users/$USER/Applications/WatchGuard/uninstall.sh).
- When the computer starts, press Command + S to enter Single User Mode.
- To set the disk to readwrite, type the command mount -o update /.
- To run the uninstall script, type the command sudo sh /Applications/WatchGuard/Logon\ App\ for\ Mac/uninstall.sh.
- After the Logon app is uninstalled, restart your computer.
If your user login fails, you can still uninstall the Logon app with your computer in Safe Mode.
The Windows Installer (msiserver) does not work by default in Safe Mode. To enable Windows Installer in Safe Mode, you must modify a registry key.
To uninstall the Logon app for Windows in Safe Mode:![]()
- Start your computer in Safe Mode.
- After you have logged in, type cmd in the Cortana search box.
- Right-click the Command Prompt app and select Run as administrator.
The User Account Control dialog box appears. - Click Yes.
- In the Command Prompt dialog box, type one of these commands and press Enter:
- If your computer is in Safe Mode, type reg add "hklm\system\currentcontrolset\control\safeboot\minimal\msiserver" /ve /t reg_sz /f /d "service".
- If your computer is in Safe Mode with Networking, type reg add "hklm\system\currentcontrolset\control\safeboot\network\msiserver" /ve /t reg_sz /f /d "service".
- To start the msiserver, in the Command Prompt dialog box, type net start msiserver. Press Enter.
- You can now uninstall the Logon app in Safe Mode:
- Open the Windows Start menu and select Settings.
- Navigate to Apps & Features.
- Select AuthPoint Agent for Windows.
- Click Uninstall.
- After the Logon app is uninstalled, restart your computer.
To uninstall the Logon app for macOS in recovery mode:![]()
- When the computer starts, immediately press and hold the Command (⌘)/ALT + R keys.
The Apple logo appears . - Release the Command (⌘)/ALT + R keys when you see the recovery options.
- If FileVault is enabled, when you enter recovery mode you are prompted to specify an account that you know the password for. You must unmount and remount the disk before you uninstall the Logon app. If FileVault is not enabled, continue to Step 4.
- Select the user account and enter the password to unlock the drive.
- Launch the Disk Utility application.
- Select Macintosh HD.
- To unmount the disk, select File > Unmount.
- To mount the disk again, select File > Mount.
- Select Utilities > Terminal.
- In the Terminal window, type the command cd /Volumes/Macintosh\ HD/Applications/WatchGuard/Logon\ App\ for\ Mac/.
- Type the command sh .recovery.sh.
- Type reboot.
- To uninstall the Logon app, navigate to /Users/$USER/Applications/WatchGuard.
- Run the Logon_App_for_Mac_uninstall.pkg package file.
- Follow the steps in the wizard. When you finish, you must restart your computer.
Authentication with the Logon App
When the Logon app is installed on a computer, authentication is required to log in. On the login screen, users must type their password and then select one of the allowed methods of authentication. Which authentication methods are available is determined by the highest authentication policy that includes the Logon app resource and the user's group.
If push authentication is enabled, users can select the Automatically send a push notification when I log in check box to make the authentication process easier. When this option is selected, the Logon app automatically sends a push notification to the user after they enter their user name and password.
The Logon app does not support automatic logon for Windows.
To log in to a computer with the Logon app installed:
- In the User name text box, type the user name for your domain user. To log in as a local user, type your user name as <hostname>\<username>.
- In the Password text box, type your Windows or Mac password. For Active Directory user accounts, type your AD password.
- Click Next.
If MFA is required, you see the authentication screen. If the authentication policy for your group only requires a password, you are logged in. - If MFA is required, below Sign-in options, select an authentication option. Push is the default authentication method. If you select a different authentication option, that becomes the default authentication method.
If your computer does not have an Internet connection and MFA is required, you must select the one-time password or QR code authentication options to authenticate offline.
- Press Enter or Return and authenticate.
- Push — Approve the push notification that is sent to your mobile device.
- QR Code — Use the AuthPoint mobile app to scan the QR code, then type the verification code shown in the app.
- One-Time Password — Type the one-time password for your token.
If you do not have your token, you must use the Forgot Token feature to log in to a computer with the Logon app installed. For more information, see Authentication Without Your Mobile Device.
See Also
Configure MFA
About AuthPoint Authentication Policies
About Authentication
What Does Watchguard Authpoint Logon App Do?
Source: https://www.watchguard.com/help/docs/help-center/en-US/Content/en-US/authpoint/logon-app_about.html#:~:text=The%20Logon%20app%20enables%20you,for%20RDP%20and%20RD%20Gateway.
Posted by: kellyhishentimed.blogspot.com
0 Response to "What Does Watchguard Authpoint Logon App Do?"
Post a Comment